Today's Insights: How to Calibrate a Miter Saw - Achieving Precision Cuts
Whether you're unboxing a shiny new miter saw or noticing your trusty workhorse isn't delivering those laser-precise cuts anymore, calibration is your secret weapon. A miter saw that's even slightly off can throw your entire project into disarray, costing you valuable time and materials. We're here to guide you through a simple, effective method to calibrate your miter saw, ensuring accuracy without getting bogged down in overly complicated techniques. Think of it as a regular tune-up for your saw, keeping it in peak condition. Trust us, consistent calibration translates to projects that not only look professional but also save you money and frustration in the long run.
Essential Tools for Miter Saw Calibration
Before we dive into the nitty-gritty of calibration, let’s make sure you’ve got your toolkit ready. Having the right tools makes the process smoother and boosts accuracy. Here’s what you’ll need:
- Straightedge or Bubble Level: A 24-inch straightedge is ideal for checking flatness. Look for levels from Stabila and Milwaukee that are known for their accuracy.
- Combination Square: A 4-inch trim square is preferred for verifying right angles. Starrett combination squares are a reliable choice for precision work.
- Feeler Gauges: Essential for detecting even the tiniest gaps; a feeler gauge set is key for precise measurements.
Having these tools handy will not only streamline the calibration process but also give you the confidence that your adjustments are spot-on.
When to Calibrate Your Miter Saw
Knowing when to calibrate is crucial. Here’s a simple guide:
- The First Use: Always calibrate a miter saw before its first use, whether it’s brand new or a seasoned veteran.
- Regular Check-ups: The frequency of recalibration depends on usage and the type of projects.
- The Quick Flip Test: Before each use, do a quick flip test with scrap lumber.
- Weekly Deep Dive: Check each calibration point weekly using your level and square.
- After a Bump or Bang: Recalibrate if your saw takes a tumble or gets knocked around.
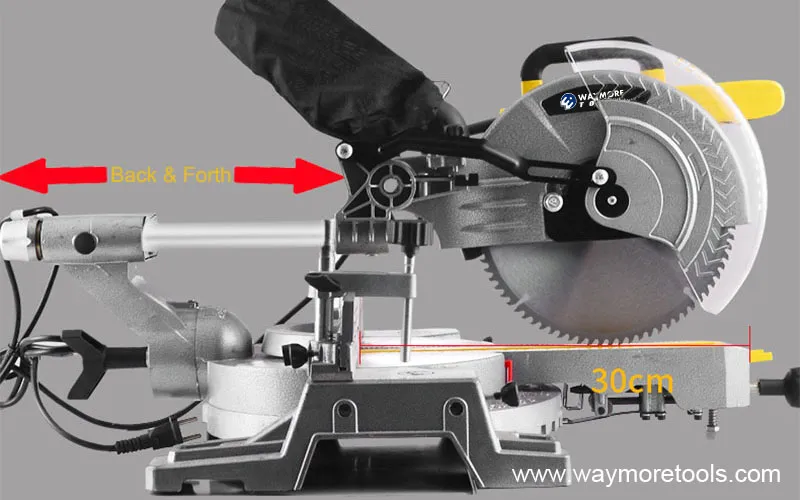
Step-by-Step Calibration Process
Safety first! Ensure your miter saw is disconnected from its power source before starting.
Inspecting the Blade
The blade is the heart of your miter saw. Check for:
- Tooth Check: Inspect each tooth for chips, breaks, or missing pieces.
- Buildup Inspection: Check for pitch, sap, or general gunk.
- Wobble Test: Run the blade to check for any wobble; clean, sharpen, or replace as necessary.
Leveling the Table
Your table needs to be as flat as possible to ensure accurate cuts.
- Straightedge Test: Use your level to check for dips or bows across the table.
- Feeler Gauge Check: Check for gaps; any significant gaps may require correction.
- Correcting an Uneven Table: Identify high spots and sand them down.
Squaring the Fence
Ensure your fence is perfectly square:
- Combination Square Check: Check for a perfect 90° angle between the fence and table.
- Adjusting the Fence: Loosen bolts, adjust, and retighten.
- Split Fence Alignment: Align both sides of the split fence with a straightedge.
Calibrating the Miter Angle
Time to fine-tune the miter angle:
- Set to Zero: Start from the 0° miter detent.
- Combination Square Check: Check for gaps between the square and the blade.
- Adjusting the Detent Plate: Make necessary adjustments until perfectly square.
- Adjusting the Angle Indicator: Ensure the indicator reads 0° accurately.
Calibrating the Bevel Gauge
Ensure accurate tilted cuts by following similar steps as the miter angle:
- Set to 45 Degrees: Lock into the 45° bevel detent.
- Combination Square Check: Check for gaps with your combination square.
- Adjusting the Bevel: Use the bevel adjustment bolt for alignment.
Verifying Calibration with the Flip Test
Perform the flip test for final verification:
- Create a fresh edge with a standard 90° crosscut.
- Cut a short piece, flip it, and check for gaps.
Conclusion
Calibrating your miter saw may seem tedious, but it's an investment that pays dividends through accurate cuts and longer tool life. So, take the time to calibrate your miter saw – your projects (and your wallet) will thank you for it.
Ready to take your knowledge of power tools to the next level? Contact us today to explore our comprehensive range of resources, from in-depth guides to expert tips, and discover how you can maximize the performance and longevity of your tools!
As our company continues to participate in this grand event, we remain committed to offering the best power tools and machinery solutions to meet the needs of our global partners. Whether you are a wholesaler, importer, or distributor, we are ready to collaborate and support your business growth.
If you are interested in our Power Tools, welcome to contact with us, and we are here to offer you best service and great products, thank you!
Contact: Daniel
Email: daniel@waymoretools.com
Website: www.waymoretools.com